Showing posts with label Patterns. Show all posts

Wednesday

Handmade Christmas Tree #1

I've decided to make a "handmade Christmas tree" this year! All the decorations will be homemade by me and I can't wait to see it all put together!

I wanted a really organic natural feel to everything, especially the tree topper.

This star turned out more perfectly than I could have hoped for, though it doesn't look like the pattern depicted at all!

This is the original...


And here's mine...


This isn't my first go-round at the crochet hook and I do know how to read a pattern, but for some reason, mine looks nothing like the original!

The original pattern is here and the finished size is listed as 5 1/4 inches finished... I used the indicated hook size and thread size and it ended up being 12 inches across!

No idea what happened, but I love it!

To keep it on the tree, I placed a loop of elastic from one side of the center hole to the other. It makes a wonderful holder without distracting from the beauty of this piece.

I did starch the finished piece as part of the blocking process so that it will stand up as the tree topper.

I can't wait to see it all together as we get closer to Christmas and I'm looking forward to you seeing the rest of the decorations!

Monday

Table Runner


Update:

I just took the table runner down from my blocking board and here it is on my side table!


I got a wild hair to make this really cute table runner that I found on Ravelry (I spend waaaaay too much time there!).

Here is the pattern!

I ended up not being able to find the color in the original pattern, which I liked alot, but I did find the brand in a different color and stayed with that! It is going to be a Christmas gift so I thought the more neutral cream would be better than the gray.

The finished product before blocking is actually tiny, but it stretches tremendously!

Here it is in the process of being blocked... I'll let it dry over night and then wrap it up for Christmas!


Here's a close up of the pattern. Cute huh?


Total time to make this project was about 5 hours. Not too bad!

Let me know how it comes out for you! Happy Crafting!

Friday

Trip to the Yarn Store

A few weeks ago my husband celebrated his 29th birthday and his family drove down to spend the weekend with us in honor of the event. Had a great weekend made even better by the fact that I got to introduce my mother-in-law to the joys of knitting and yarn hording!

My mother-in-law had seen me knitting before and thought that she might want to try it out too. So we headed over to the local yarn store in Spring, Twisted Yarns.

They have SO MUCH YARN there, in all colors, sizes, and fibers you can imagine. I think it was almost too much for Julie to handle. She kept darting from one skein to the next; we had a great time!

At one point she turned to me with a big smile on her face and said "Is this what it's like to be a yarn whore??"

Well, an hour later and with several purchases under her belt, we headed home to play with our new yarn.


This is a skein of handspun/hand dyed yarn which is actually a lot more scarlet than purple in real life. I'll be making a drop-stitch scarf out of this.

Julie got two other skeins of yarn for scarves; one that I used on my new knitting machine and the other I'm knitting in a loose garter stitch.


This is the knitting machine scarf being blocked. It was made with a superwash wool blend by Berroco which you can buy online here.

The last skein of yarn that Julie purchased for me to make her a scarf from was this beautiful Japanese silk!


She kindly bought me one in scarlet for my efforts! I can't wait to get to it... in the meantime, here is the progress on her scarf. I'm using size 10 needles and a garter stitch to get the effect.

Cables

Well, since I just learned to knit a few months ago, I figured now would be the perfect time to try out one of the harder stitch types! Cables.

In all honesty, I had been wanting to try them for a month or so but was too chicken to try it and fail. But a few weeks ago I taught my mom how to knit and a trip to the yarn store ensued where many books were purchased, including several books on cable patterns.

Mom was SO excited to try cables, and since I was the one who taught her the basic knit stitches, I was the one in charge of learning cables first so that I could walk her through it.

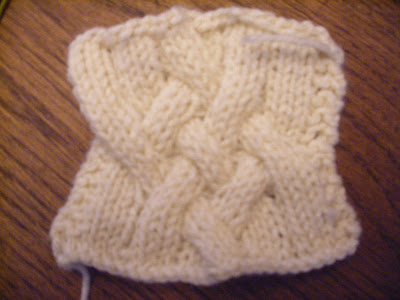
SHOCKINGLY, it was pretty darn simple and fun! Here is the first cable we tried. The Cable Crossing pattern from 50 Fabulous Knit Aran Stitches


So then I naturally went Cable CRAZY and made a few other pieces. Some of which I can't show you yet because they're Christmas gifts... but here is one item that you can check out!


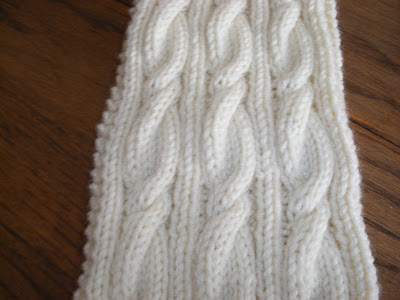
This is a free pattern from Ravelry called Elegant Cabled Scarf or you can get the PDF directly from her site here. It took about 12 hours total to finish this scarf and it was well worth it, I love it!

Thursday

BABY SWEATER!!!!!

So, one of our friends is having a baby. A "little geeky baby" to be exact. So I thought I should make her something fitting for that title!

And what better to fit the image of a "little geeky baby" than..... a yoda sweater!


As you can see, I modified it just a little to have a button instead of a tie. I like it better, but either way it's ADORABLE!

It took about 10 hours total to make and was well worth it. It is just about the cutest thing I have EVER seen! If you make one (and I would really recommend it, it's great) let me know and we'll put a picture of it up.

Lace!

Well, not real lace, but teeny tiny crochet that looks like lace.

It's made with mercerized cotton and the tiniest hook I have ever seen. This one took me about an hour and a half the first time I made one. The second took about 45 minutes. I've made 4 so far and hope to get the time down with each one that I make. So far it's working :-)


So there you go. I love it! I'm thinking of making a pillow and having the lace over a solid color. I really like the way the color shows through! We'll see... a tablecloth would be nice too, but I'm not sure I could make 250 of them and maintain my sanity!

Pattern: Here is the pattern if you would like to attempt one for your very own!

Happy crafting!

Monday

One more...

Ok, I have a few more projects to blog about, but I'm tired and so I'm only going to do ONE more for now. And this one... is so amazing to me, I can't believe I made it!

A sock.

An amazing, soft and cuddly, black knitted sock. Modeled here by my husband.


I had never attempted socks before, but decided to give it a try about a month ago. I failed at creating a summer sock because of the yarn (it was way too thick) but it was a nice around the house sock. Really wanting to make "wearable with regular shoes" type socks, I got some actual sock yarn and tried again with great success!

I found a video series on YouTube for toe-up socks (which makes the most sense to me) and got to work. The videos were really well done and I had no trouble following along.

Here is a link to the first video: Video 1

I only have one done so far, but plan on making many many more very soon!

If you decide to give this a try, send me a picture of your project! I'd love to see what you all are doing too!

Happy crafting!

Just in time for the 4th

One of the many things I'm making for friends and family this year for Christmas was an American flag afghan (which is sooooo soft, I love it!)


This little beauty only took about 10 hours total and the finished size is 6ft by 4ft. The pattern is one that I made myself and is not really anything special in and of itself, but I wanted a little variation to give the strips some depth.

Rows 1-2: DC across all stitches
Rows 3-5: SC across all stitches
Rows 6-7: DC across all stitches
Change colors and repeat rows 1-7

For the stars I followed a pattern that I found online and then sewed them on top of the blue with a quick whip stitch. I can't find the pattern for the stars again, but it was so easy that I still remember it.

Stars -
Row 1: ch 3. 9 dc in 3rd ch from hook, join round with a slip stitch.
Row 2: ch 5. Slip stitch in first ch from hook, SC in next ch, HDC in next chain, DC in next ch. Skip 1 DC and slip stitch in next.
Repeat row 2 until all 5 points are created.


Like I said, this was a very quick and fun project and I would highly recommend making your own this year! Happy early 4th of July to all! :-D

Tuesday

First Knitted Sweater

Well, here it is! My first attempt at knitting...


No, one sleeve it not shorter than the other, it just kinda looks that way from the way I folded it!

I used a very loose version of this pattern. I made it with 3/4 length sleeves and with a standard v-neck instead of that in the actual pattern. I also used a garter stitch instead of the stockinette. So basically, I just used this patten to know when to narrow in for the sleeves!

I thought a little crochet edging might look nice as well, so I used this pattern for the edge of the sleeves and around the bottom edge of the sweater and it turned out really well!


The fit is perfect and all I have to do is tuck in all the loose ends. I love how soft this sweater turned out. The I love this cotton! yarn from Hobby Lobby is excellent and very soft!

That's all for now, I'm starting my portrait crochet project this week and will update as soon as it starts to look like anything recognizable! :-)

Happy Crafting!

Dragon!!

Update: Click here for the pattern! I just realized the link was a little too embedded to see well :-)

Hello all!

I know it's been awhile so I thought I would whip up something extra special to try and make up for it.

I saw this adorable pattern about a month ago and have been dying to make it every since. But with one project or another in the works, I didn't want to have too many things going at once and therefore refrained from making one.

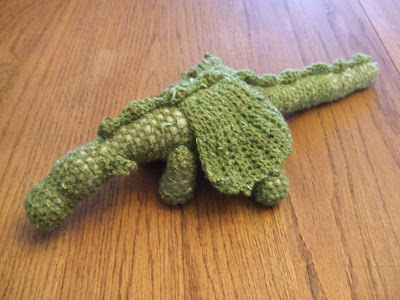
However! I finished the sweater I had been working on this Friday and decided to take the weekend off to make something really fun! So here it is... my dragon!


I know, I know... it's almost too cute for words, but I'll try :-D

I used Little Britches yarn in Baby Camo with a 5.5mm crochet hook which, looking back, was a little too big. I had never made a crochet stuffed animal before so this was a completely new crocheting experience for me!

Much to my surprise however, it was relatively simple and quick! In total the entire project took about 6 hours. Which I think is pretty darn good for a first time dragon maker!

I still need to embroider the eyes and talons onto the finished dragon, but I was just too excited to show everyone that I couldn't wait to post!

Anyway, I love it and I hope you do too! If you would like to try your hand at making your very own dragon, you can find the pattern that I used here.

Next up: The sweater...
As I mentioned above, I finished my first hand knitted sweater this week! Post and pictures soon to follow :-)

Happy Crafting!

Friday

Harry Potter Sweater and Pattern

For Christmas this year I decided to make my two younger brothers a Harry Potter inspired Weasley sweater. Instead of a W for Weasley I decided to put an M for Moore.

I had never tried color changing with crochet before, and it was a bit tricky, but it worked out really well in the end. I'll talk more about that a little later.

I used this pattern that I found online. It has a really great ribbing technique that turned out amazingly well. After finding the pattern, I used a piece of graph paper to chart out the big M for the middle.

Just recently I found a really great website that will chart an image for you at a 1 square to 1 stitch ratio... it's pretty awesome. knitPro is a great way to chart your pattern without much effort.

The yarn that I used felt very soft when I picked it out... buuuuut, it wasn't for the final product. One yarn that I have fallen in love with is I Love This Cotton yarn brand. It comes in many colors, is available at most hobby and craft stores and is lightweight and very comfortable when crocheted or knitting into a final product.

Anyway, I mentioned changing colors earlier so here is the technique I used with the double crochet stitch for the pattern.


It took about 18 hours per sweater for the entire process, including sewing it together, which I did with a whip stitch on the backloop of each stitch while the pieces were facing each other right side to right side.

All in all I think the sweaters turned out really well, especially for a first attempt! Next time (and yes, I'm sure there will be a next time) I will use the I love this cotton yarn for an even better result!

If you use this pattern to make your own Harry Potter inspired sweater send me a picture here and I will post it! :-)

Happy crafting!

Sneak peek... Portrait Crocheting!


My friend Lee over at Totallee.net got me interested in the idea with her amazing creations shown above. So I have started my first attempt! Which I will show you soon...

Wednesday

Patterns

I plan on putting up patterns for all of the projects that I post so that you can recreate them on your own!

Look for the Family Tree outline very soon. It's fairly large so I'll have to scan it in pieces and then put them back together in Photoshop. So once I get all that done, I'll post it for you to download.

Now back to knitting for me...

Happy crafting!